Long story short, a couple of years ago I studied abroad in Egypt. Yes, right after I got there the January 25th Revolution happened and yes, I stayed anyways. For my blog from my time there, go to kerryinegypt.blogspot.com or click here.
Anywhooo, I try to visit Cairo as much as possible, since I fell absolutely in love with it! On one of my recent trips, I picked up this beautiful golden metal lamp from one of the shops in the Khan el Khalili (giant market place in Cairo). Unfortunately, the light that was already installed in the lamp was not the right kind (excuse my horrible lack of knowledge on the specifics of this) to be plugged in when I got back to America - I was told it would start a fire or explode or do something else ridiculous.

The lamp says in Arabic "SubhanAllah," which means something along the lines of "Glorious is God" - basically you say it when something inspires wonder in you with its beauty or complexity or amazingness. I love it :)
Yesterday a miracle happened and I finally remembered to drag my butt to the hardware store to buy the parts required to create a functioning lamp out of my poor lonely lamp-shell. I have to note that my friend Tess gets all the credit for putting everything together while I uselessly sat next to her observing the process.
Here's how I would recommend going about this:
Take a trip to your local hardware store, taking the lamp with you. We went to McGuckins, our favorite because the employees are very helpful and knowledgeable. They will be able to set you up with the necessary parts. This shouldn't cost more than $10 or so.
In our case the parts included:
- a socket to put the light bulb in, with wiring attached
- a bolt and nut to secure the socket to the metal tab on the lamp (see pic below)
- light bulb of desired brightness that will fit in the socket (15 watts is what we chose)
- a cord with a plug and a switch
- two wire attaching tip things (potentially called nipples - I don't exactly remember)
Tess began by screwing the socket onto the metal tab (which came with a hole in it for this purpose) to attach it to the lamp.

Then, using the wire attaching tip things (like my technical terminology??), secure each wire from the socket to its matching wire on the plug/switch cord. The people at the hardware store can tell you which pairs with which. If you're fancy, you can shorten the cords from the socket to the desired length (requires wire strippers). We however chose to leave them at the length they came.
 The pic above shows the two cords attached together. After plugging in the lamp, I hid the attachment part behind the table I put the lamp on. You can put electrical tape around these ends as well if desired.
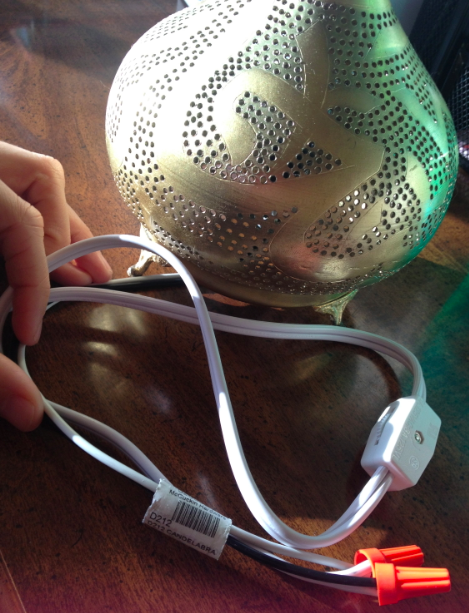
Here is another picture of the cords, including the switch, to give you an idea of what the whole thing looks like:

And voila! Zee final product, with a proud Tess:

Yay for my pretty lamp! :D
Note for anyone buying these sorts of things: Please don't put anything (decorations, jewelry, lamps, etc.) with religious words on them in the bathroom, it is extremely disrespectful.
Anywhooo, I try to visit Cairo as much as possible, since I fell absolutely in love with it! On one of my recent trips, I picked up this beautiful golden metal lamp from one of the shops in the Khan el Khalili (giant market place in Cairo). Unfortunately, the light that was already installed in the lamp was not the right kind (excuse my horrible lack of knowledge on the specifics of this) to be plugged in when I got back to America - I was told it would start a fire or explode or do something else ridiculous.

The lamp says in Arabic "SubhanAllah," which means something along the lines of "Glorious is God" - basically you say it when something inspires wonder in you with its beauty or complexity or amazingness. I love it :)
Yesterday a miracle happened and I finally remembered to drag my butt to the hardware store to buy the parts required to create a functioning lamp out of my poor lonely lamp-shell. I have to note that my friend Tess gets all the credit for putting everything together while I uselessly sat next to her observing the process.
Here's how I would recommend going about this:
Take a trip to your local hardware store, taking the lamp with you. We went to McGuckins, our favorite because the employees are very helpful and knowledgeable. They will be able to set you up with the necessary parts. This shouldn't cost more than $10 or so.
In our case the parts included:
- a socket to put the light bulb in, with wiring attached
- a bolt and nut to secure the socket to the metal tab on the lamp (see pic below)
- light bulb of desired brightness that will fit in the socket (15 watts is what we chose)
- a cord with a plug and a switch
- two wire attaching tip things (potentially called nipples - I don't exactly remember)
Tess began by screwing the socket onto the metal tab (which came with a hole in it for this purpose) to attach it to the lamp.

Then, using the wire attaching tip things (like my technical terminology??), secure each wire from the socket to its matching wire on the plug/switch cord. The people at the hardware store can tell you which pairs with which. If you're fancy, you can shorten the cords from the socket to the desired length (requires wire strippers). We however chose to leave them at the length they came.

Here is another picture of the cords, including the switch, to give you an idea of what the whole thing looks like:
And voila! Zee final product, with a proud Tess:

Yay for my pretty lamp! :D
Note for anyone buying these sorts of things: Please don't put anything (decorations, jewelry, lamps, etc.) with religious words on them in the bathroom, it is extremely disrespectful.
No comments:
Post a Comment